
Welcome!
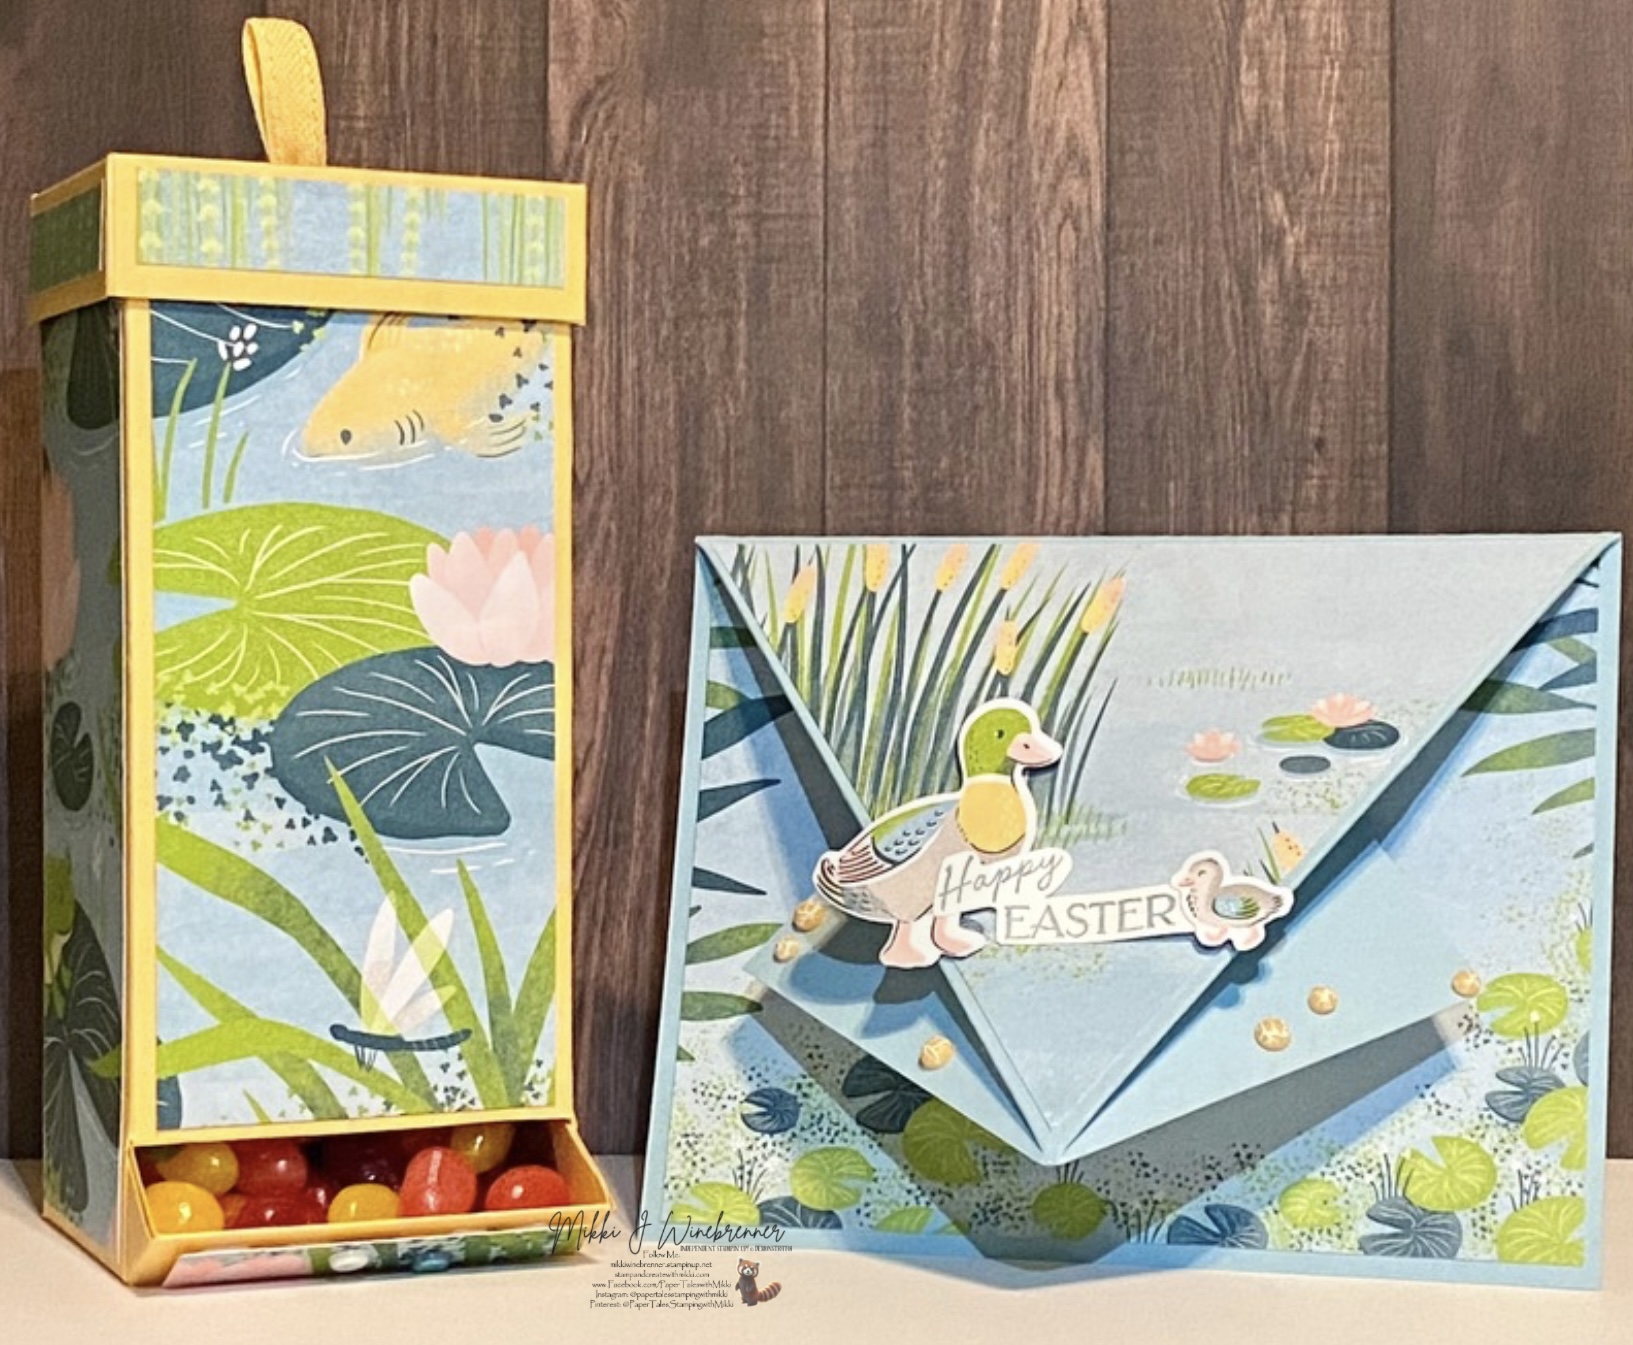
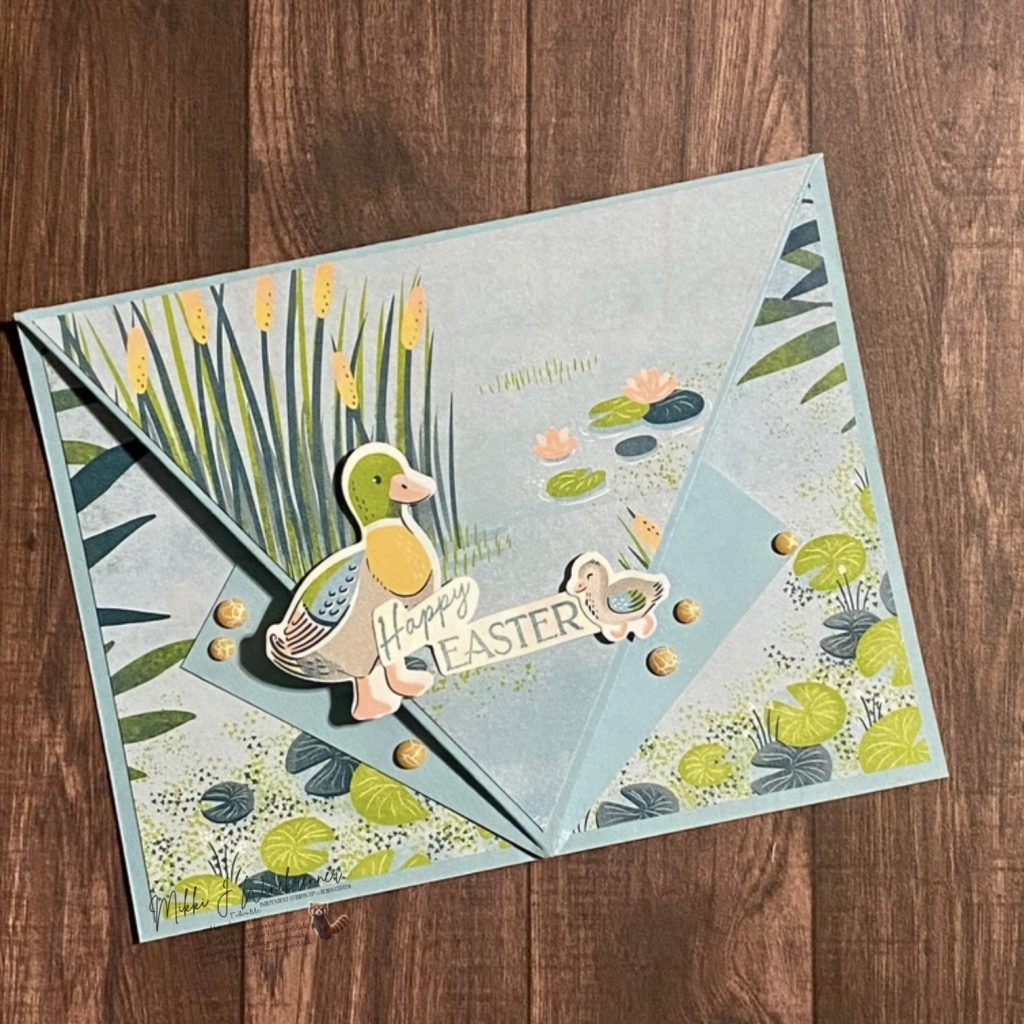
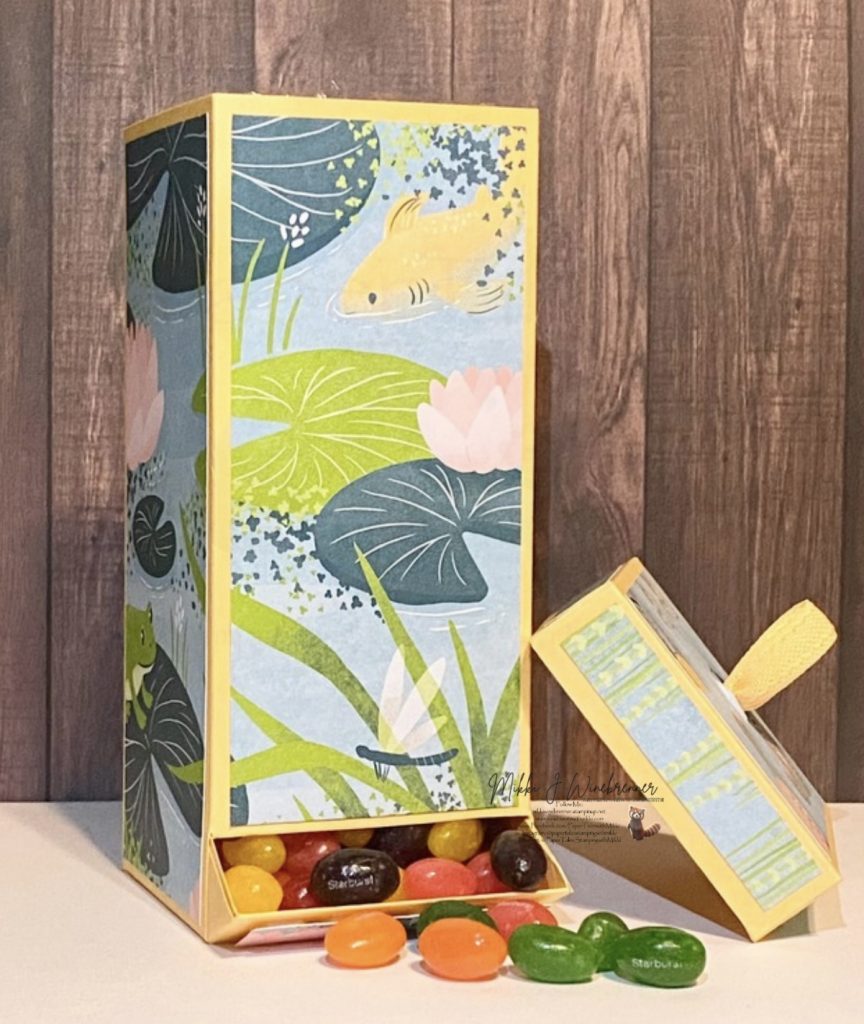
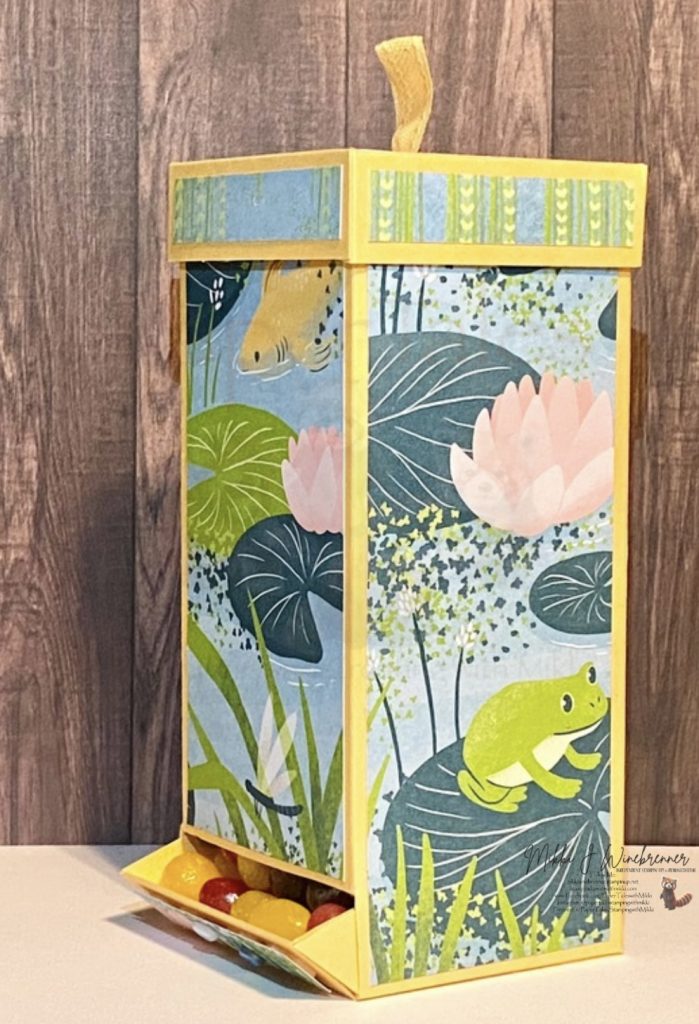
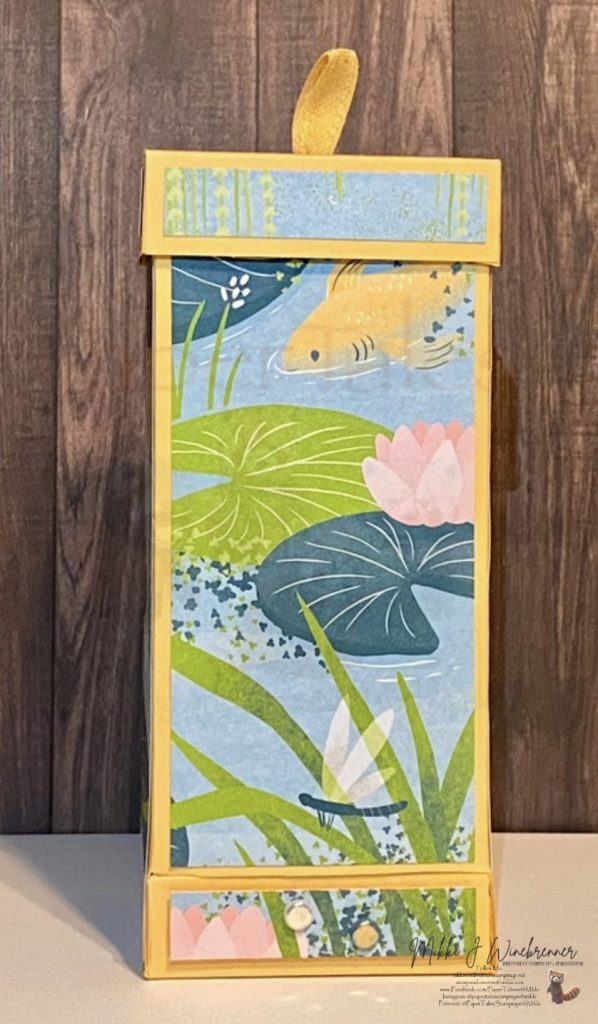
This evening I have a super fun Easter’s On It’s Way! Candy Dispenser with coordinating card!
I am using Stampin’ Up!©️ Lily Pond Lane Suite Collection for this adorable creation.!
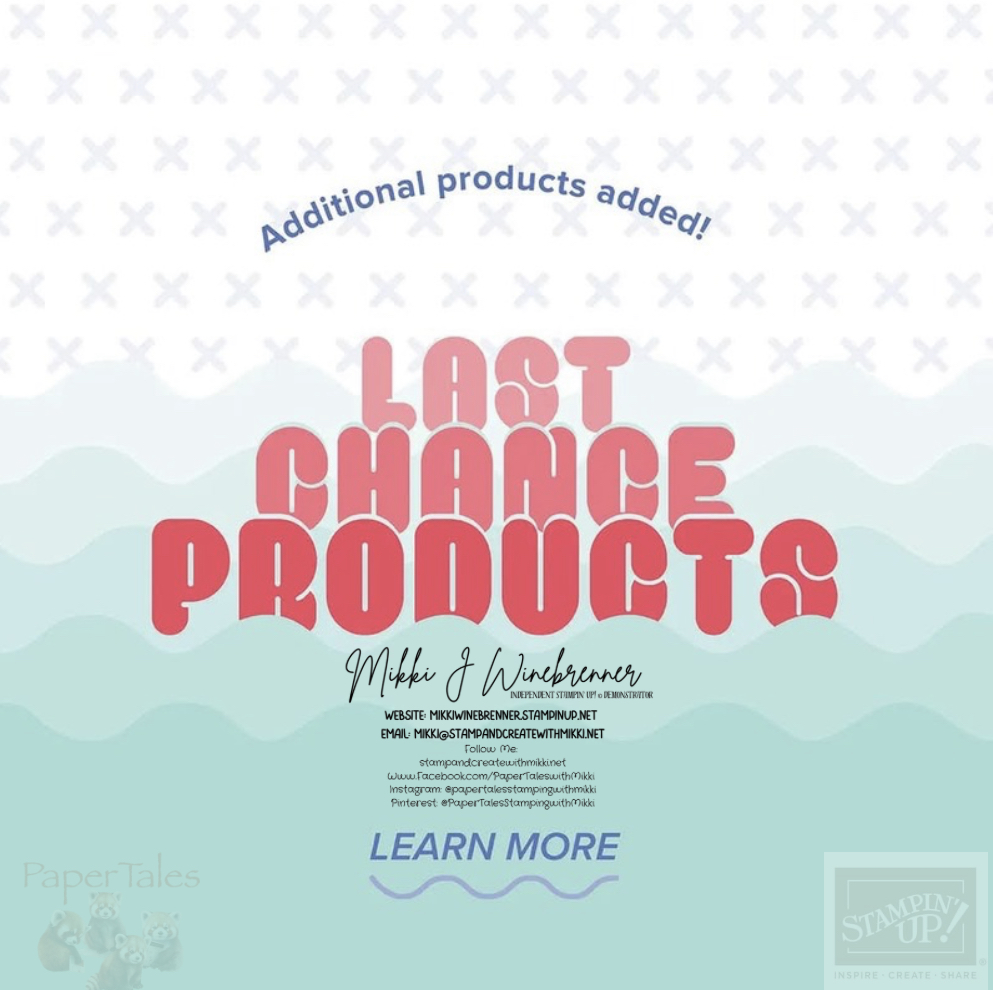
This suite collection is a Last Chance product! You can find this and all of the Last Chance products over at my store.
I have decided to take the rest of Holy Week off to regroup and maybe take a breath or two. Possibly clean my office since it’s an Easter explosion right now!
Hopefully some of these last second postings will be helpful to you for any Easter needs!
A new series will begin April 24th with Team Stamp It Mother’s Day Blog Hop.
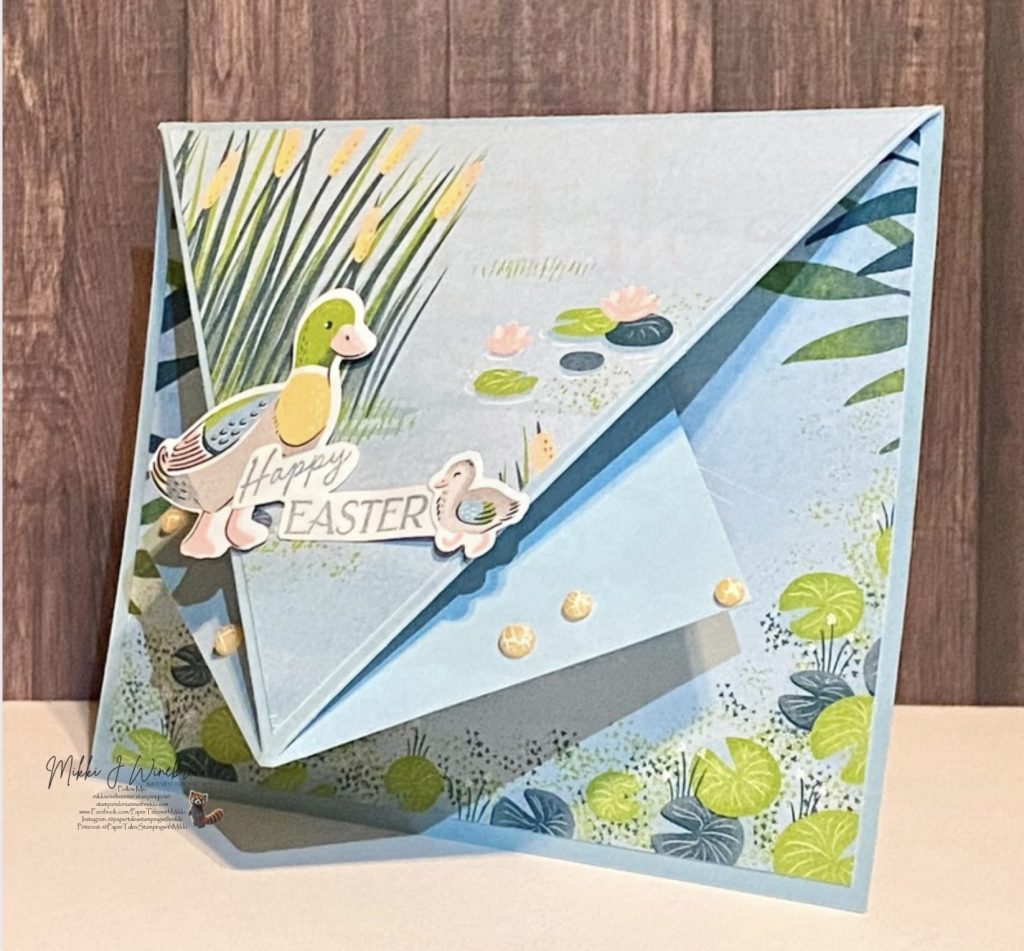
Tonight we will be working with Stampin’ Up! Lily Pond Lane Suite Collection creating an Arrow Fold Card as well as a Candy Dispenser!

The Arrow Fold Card is another card from my amazing up-line, Tami White. She has some awesome ideas and graciously shares them with us! I will link her website in here when we get to the card.
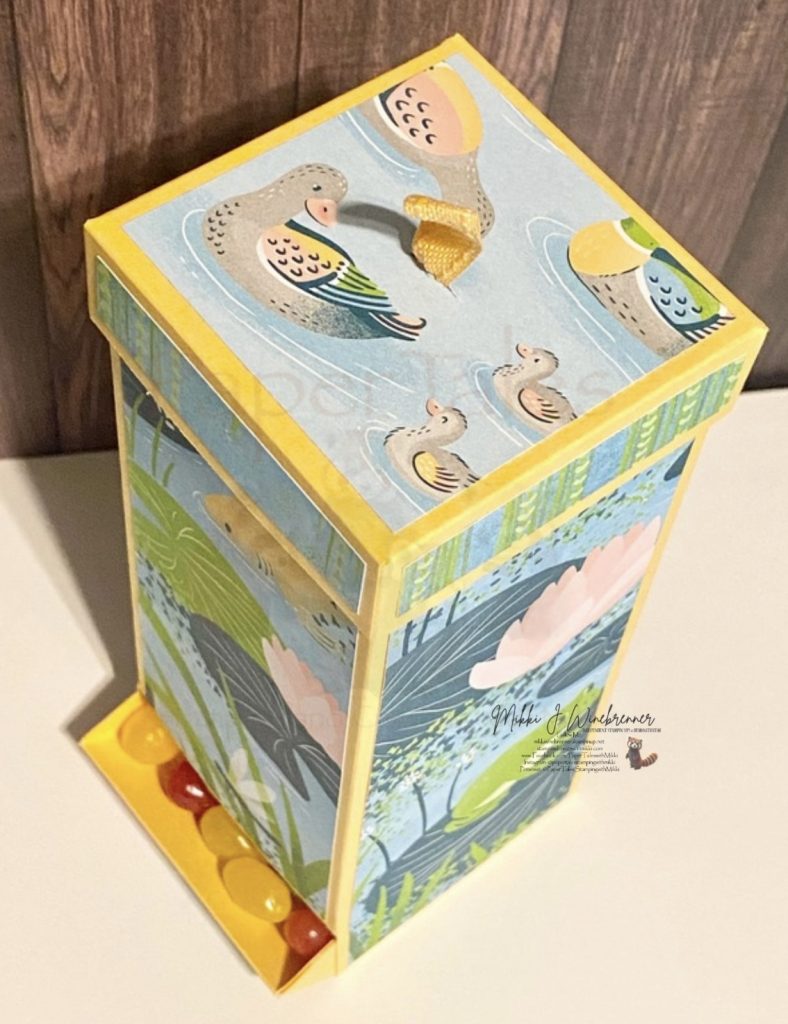
The candy dispenser is one I’ve found on Pinterest with several different ideas, patterns and themes. My mind automatically went “Jelly Beans” because I absolutely do not need a box that dispenses Jelly Beans sitting on my desk! Yet here we are 😜
LETS DIVE IN!
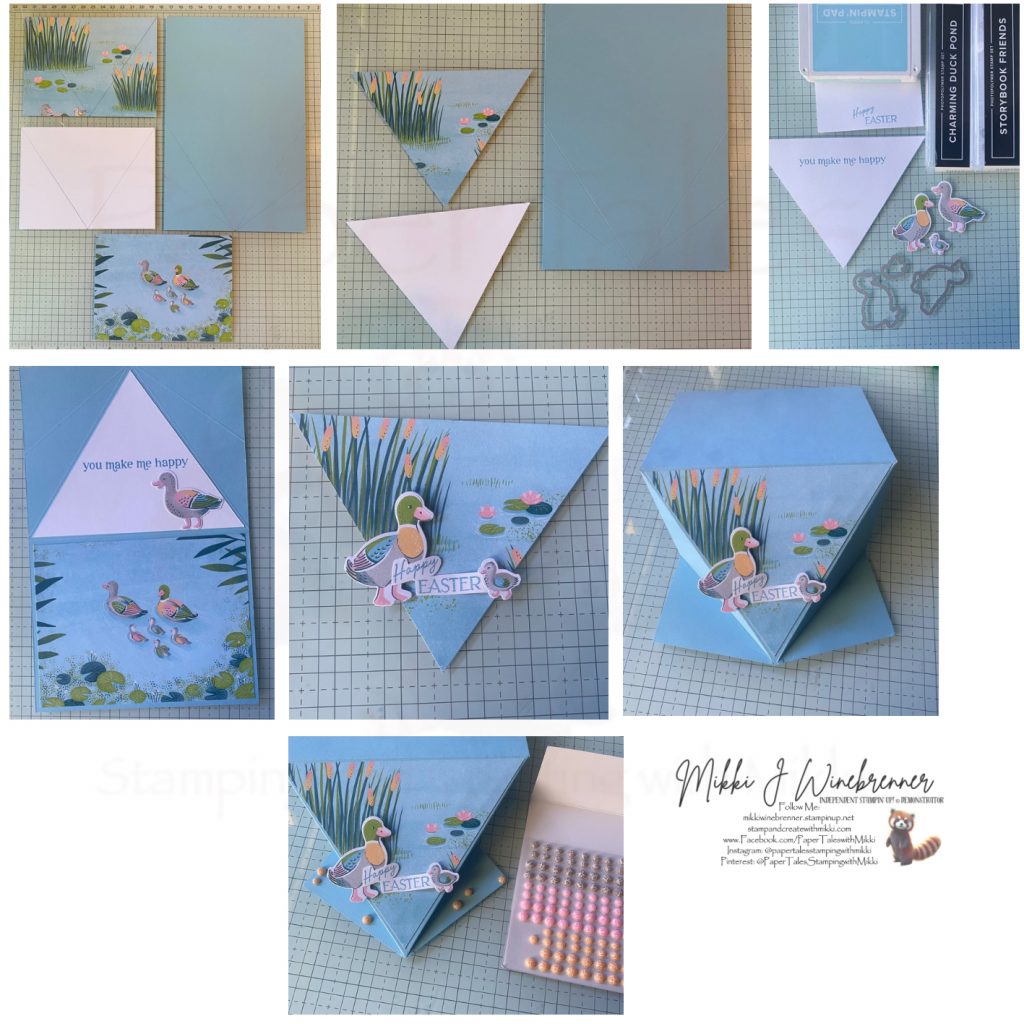
Starting with the card measurements:
Balmy Blue 8-1/2” x 11” Cardstock: 5-1/2” x 8-1/2” score at 4-1/4
Basic White 8-1/2” x 11” Cardstock: 4” x 5-1/4”, scraps for sentiment
Lily Pond Lane 6” x 6” DSP: 4” x 5-1/4” (x2), scraps for die cuts of ducks
For ink I am using Balmy Blue Classic Stampin’ Pad.
Lets create!
I am trying a new way of getting the instruction with the photo’s. I’m still learning this new platform and trying a few new things out. If you see something you like or dislike with the instructions please let me know! Your feedback is 100% important!!
As I mentioned previously this card was inspired by Tami Whites Arrow Fold Card and you can find all her details for this card here.
Instructions
- Cut all the paper down to size.
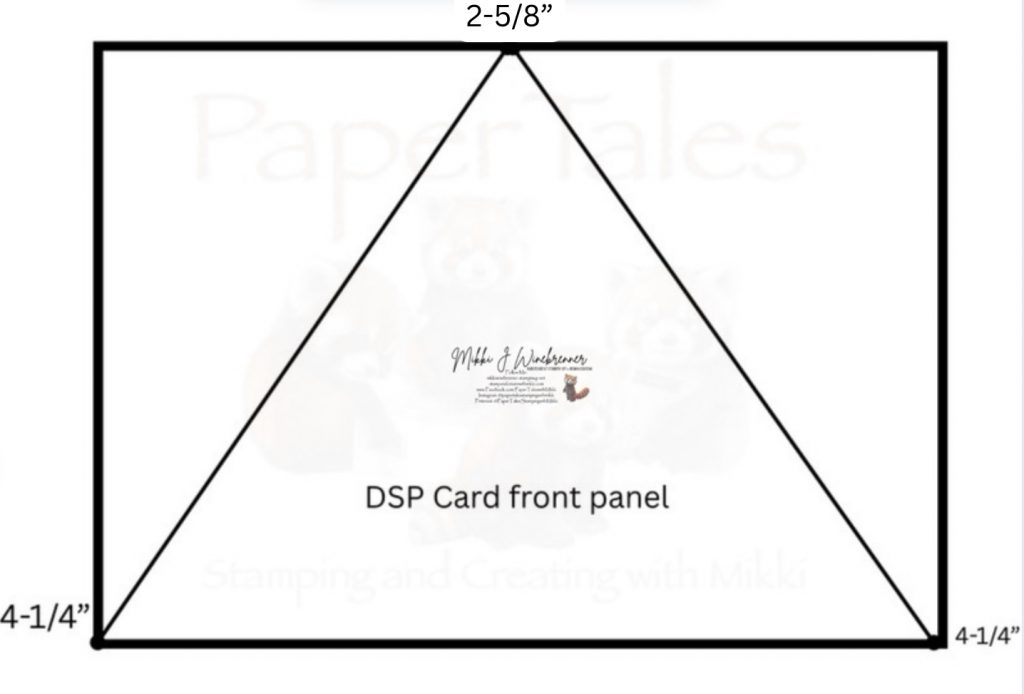
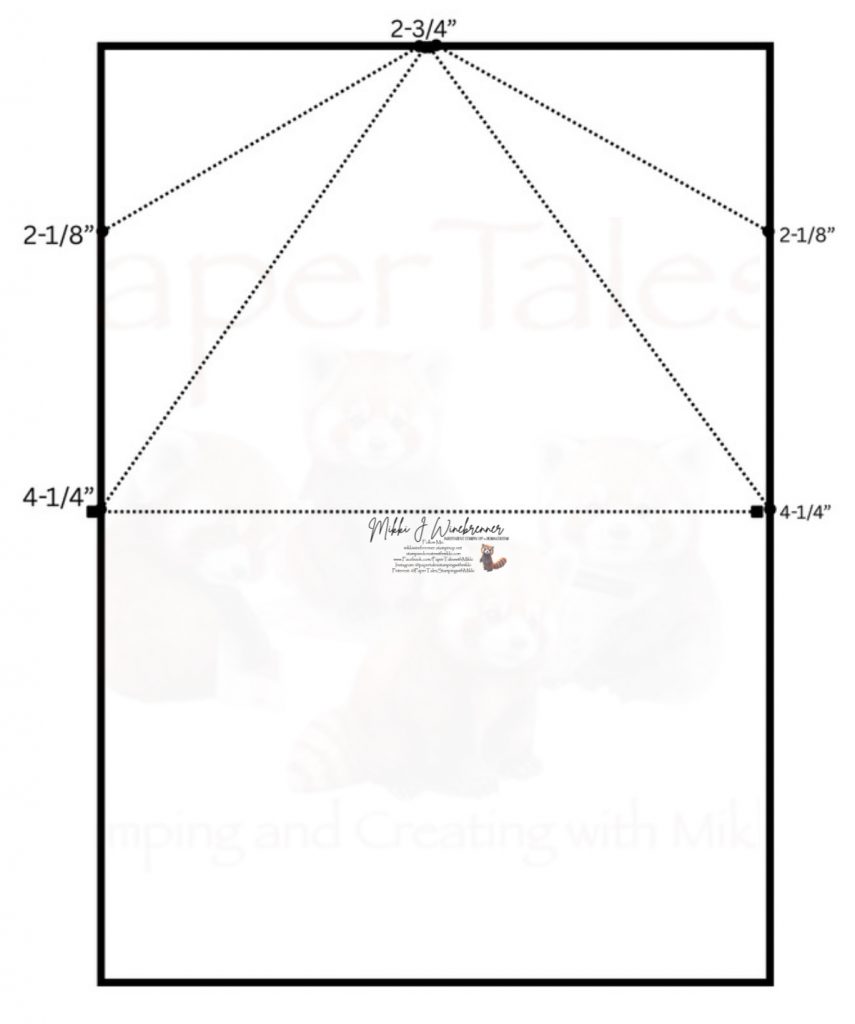
- Score the top portion of the card by marking 2-3/4” on the 5-1/2” edge and at the 2-1/8” on both sides of the 4-1/4” side. See template below!
- You will want to mark one of the DSP panels – the one you are using for the card front- and the Basic White panel at 2-5/8” on the long side an cut a diagonal line from the corner to the marker. See template below!
- Stamp your sentiment on a scrap piece of Basic White with Balmy Blue Ink.
- Fussy Cut that out with your snips.
- Cut out 2 large ducks and 1 small one from the DSP using the Stampin’ Cut and Emboss Machine and the coordinating dies or you can fussy cut them out.
- Attach the cut DSP to the arrow section on the front of the card
- Attach 2 ducks and the sentiment at the bottom of the arrow with dimensionals.
- Add some Dappled Dots to the sides.
- Attach the White to the top part of the inside card with the remaining duck.
- Attach the remaining DSP to the bottom.

Don’t forget to decorate your envelope! Set the card aside and let’s create the Candy Dispenser!
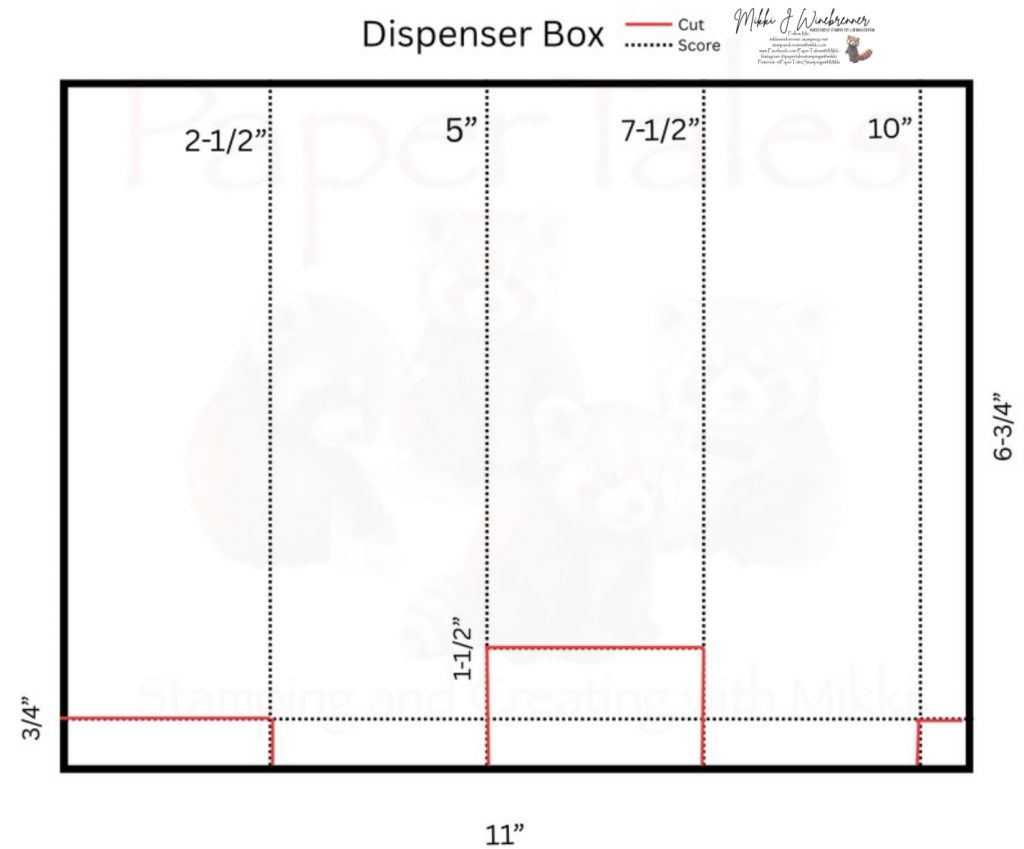
Candy Dispenser measurements:
Peach Pie 8-1/2” x 11” Cardstock: 6-3/4” x 11”, 4-1/8” x 4-1/8” and 4-1/2” x 5-3/4”
Lily Pond Lane 6” x 6” DSP: 2-1/4” x 5-3/4”(x3), 2-1/4” x 5”, 1/2” x 2-3/8” (x4), 2-3/8” x 2-3/8” and 1/2” x 2-1/4”

Peach Pie Bordered Ribbon and Riverside Irregular Pearls are the only other embellishments needed. There isn’t a lot for this project as far as material. I do recommend that if you are anything like me you may want to grab your Simply Scored Tool as there is about to be a lot of scoring going on. This will prevent any accidental cutting from happening.
Scoring and Cutting Templates


Instructions
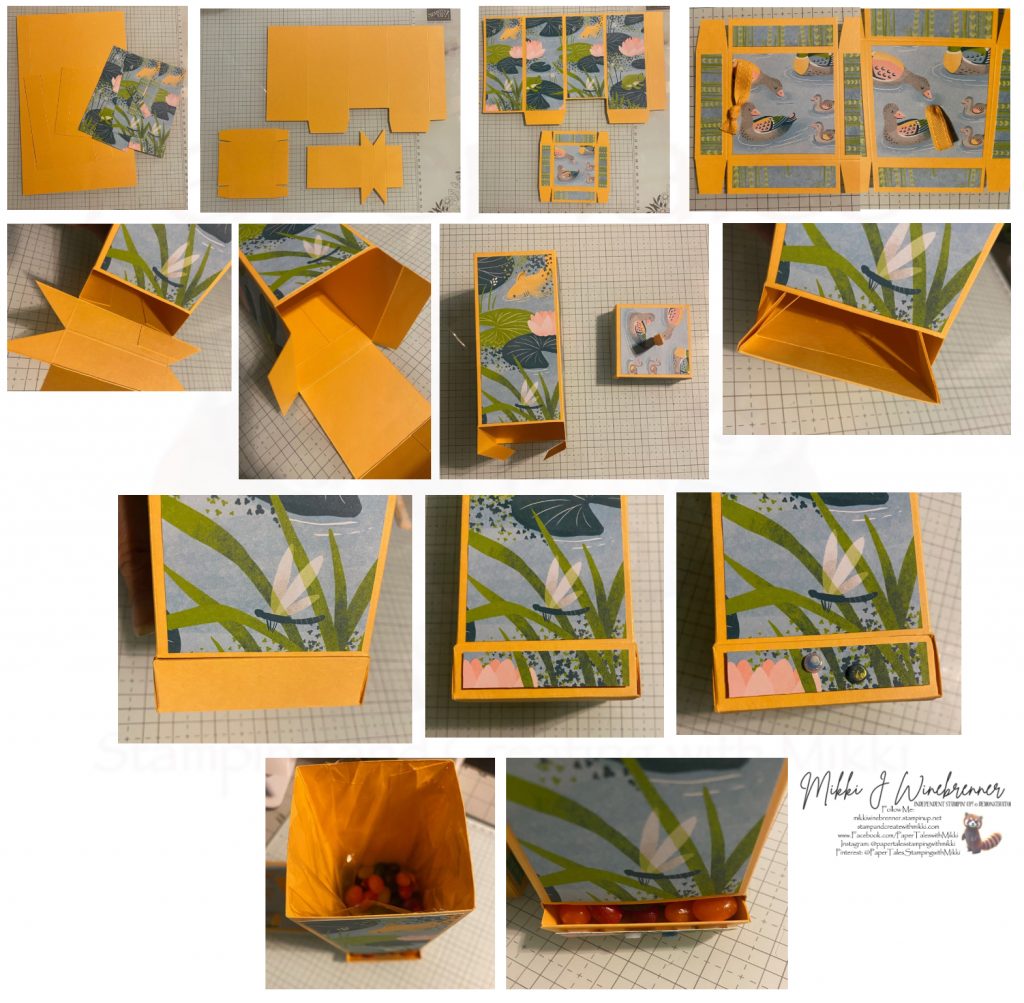
- Cut and score all your paper. Follow the templates above for scoring and cutting.
- Attach the DSP to the cardstock before assembling the box and lid.
- Cut a piece of Peach Pie ribbon at around 5”, fold it in half and tie a knot at the end.
- Using the knife on the crafters tip, cut a slit in the center of the lid.
- Feed the ribbon through that slit from the bottom.
- Assemble the box and lid using tear and tape or glue.
- Attach the dispenser by glueing the single tab to the back of the inside bottom of the base.
- Glue the 2 flaps from the base bottom to the square section of the dispenser.
- Fold the score line between the 2 points and fold the points into the box. This will create the dispenser mechanism.
- Attach the remaining DSP to the dispenser front with dimensionals.
- Add in a few Riverside Irregular Pearls for a little shine.
I did line mine with a plastic candy bag to keep it somewhat goo free from the jelly beans. You could also add M&M’s, or Skittles. Any small candy will work just fine.
I have a full list of products used on this card and dispenser, as well as links to them in my store below. If you have any questions please do not hesitate to reach out to me either in the comments below or privately!
Happy Stamping!!
Product List![Paper Trimmer [ 152392 ]](https://assets1.tamsnetwork.com/images/EC042017NF/152392s.jpg "Paper Trimmer [ 152392 ]")
![Bone Folder [ 102300 ]](https://assets1.tamsnetwork.com/images/EC042017NF/102300s.jpg "Bone Folder [ 102300 ]")
![Paper Snips [ 103579 ]](https://assets1.tamsnetwork.com/images/EC042017NF/103579s.jpg "Paper Snips [ 103579 ]")

![Peach Pie 8 1/2" X 11" Cardstock [ 163799 ]](https://assets1.tamsnetwork.com/images/EC042017NF/163799s.jpg "Peach Pie 8 1/2\" X 11\" Cardstock [ 163799 ]")
![Peach Pie 3/8" (1 Cm) Bordered Ribbon [ 163783 ]](https://assets1.tamsnetwork.com/images/EC042017NF/163783s.jpg "Peach Pie 3/8\" (1 Cm) Bordered Ribbon [ 163783 ]")
![Lily Pond Lane Suite Collection (English) [ 163354 ]](https://assets1.tamsnetwork.com/images/EC042017NF/163354s.jpg "Lily Pond Lane Suite Collection (English) [ 163354 ]")
![Adhesive Backed Dappled Dots [ 163353 ]](https://assets1.tamsnetwork.com/images/EC042017NF/163353s.jpg "Adhesive Backed Dappled Dots [ 163353 ]")
![Storybook Friends Photopolymer Stamp Set (English) [ 164668 ]](https://assets1.tamsnetwork.com/images/EC042017NF/164668s.jpg "Storybook Friends Photopolymer Stamp Set (English) [ 164668 ]")
![Riverside Irregular Pearls [ 164937 ]](https://assets1.tamsnetwork.com/images/EC042017NF/164937s.jpg "Riverside Irregular Pearls [ 164937 ]")
![Take Your Pick Crafter Tips [ 161602 ]](https://assets1.tamsnetwork.com/images/EC042017NF/161602s.jpg "Take Your Pick Crafter Tips [ 161602 ]")
![Stampin' Dimensionals [ 104430 ]](https://assets1.tamsnetwork.com/images/EC042017NF/104430s.jpg "Stampin' Dimensionals [ 104430 ]")
![Balmy Blue Classic Stampin' Pad [ 147105 ]](https://assets1.tamsnetwork.com/images/EC042017NF/147105s.jpg "Balmy Blue Classic Stampin' Pad [ 147105 ]")
![Balmy Blue 8-1/2" X 11" Cardstock [ 146982 ]](https://assets1.tamsnetwork.com/images/EC042017NF/146982s.jpg "Balmy Blue 8-1/2\" X 11\" Cardstock [ 146982 ]")
![Basic White 8 1/2" X 11" Cardstock [ 166780 ]](https://assets1.tamsnetwork.com/images/EC042017NF/166780s.jpg "Basic White 8 1/2\" X 11\" Cardstock [ 166780 ]")
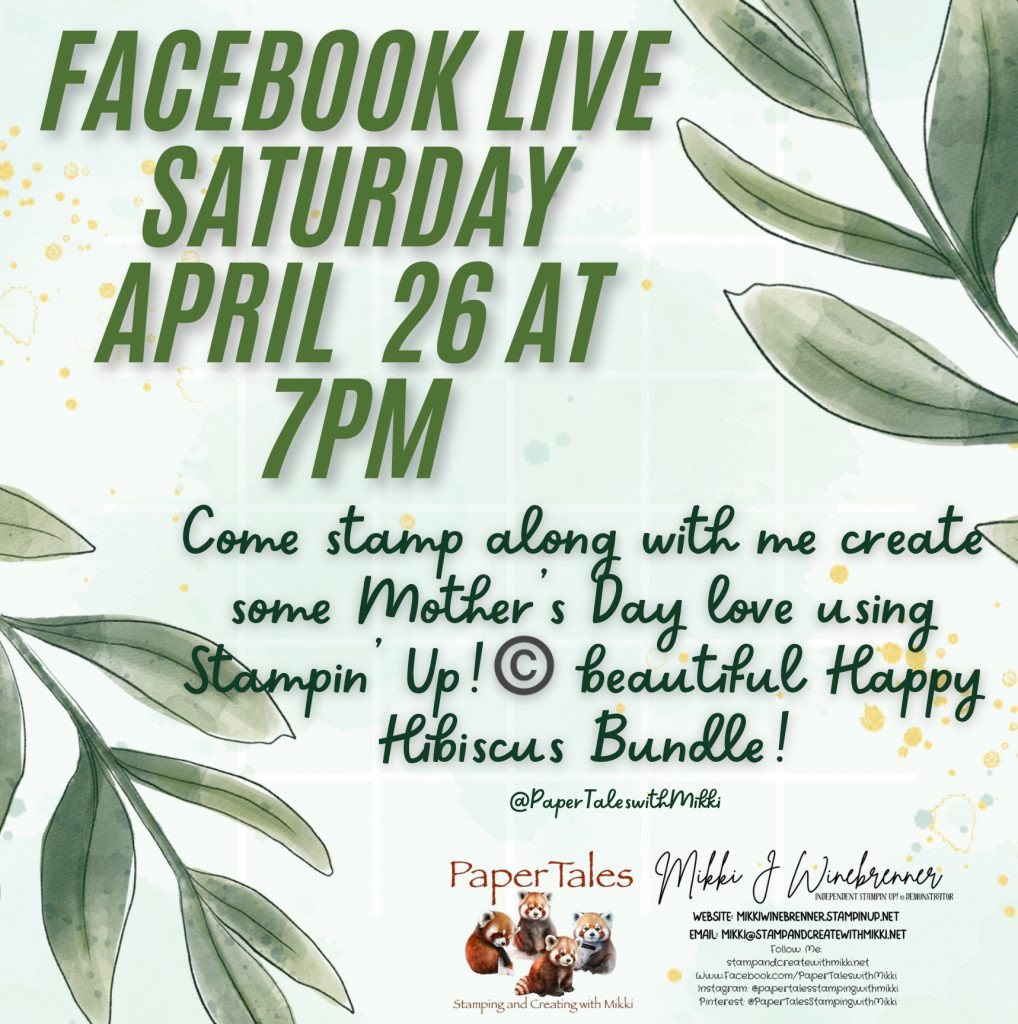
We are doing new and frighting things over on Facebook!
I’ve taken a leap into the Live Stream world with a monthly card class. I will have video recordings uploaded to YouTube and will have them linked in here as well.
Just a few little details about these classes. First and foremost, they are FREE!!
I will provide the measurements and products I use during the classes but the creativity is limitless and you can choose whatever products you would like. There is no right or wrong.
These classes are really just to bring us all together once a month and have some crafty time and relax. The class will be the last Saturday of the Month at 7pm CST and last about an hour.
The April 26th class has not been decided on as of yet. I’m leaning to Mother’s Day theme but unclear on the set/bundle to use. I’ll keep you posted. You can also follow my Facebook page to get all the latest information!
With that said, I’m always open to suggestions and anything you all might be interested in or a theme you would like to see! Just give me a shout over on my social media pages and let me know!
I will post more details on the projects as we get close to the date. This will allow you to prep as much as you need.
If you have any questions please reach out to me.
Happy Stamping!!
My Favorite Stampin Tools
| 1.Take Your Pick | |
 |
So many uses and attachments for this little tool that makes crafting so much easier! I have 3 currently in my tools drawer! |
| 2.Stampin’ Glass Mat Studio (Imperial) | |
 |
This glass mat is amazing! I love that you can write on it, stamp on it and use it to line up paper. Easy to use and super easy to clean up when you’re all done! |
| 3.Simply Scored | |
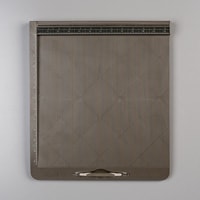 |
The Simply Scored is in my top 5 because it make scoring easy when you’re doing a bunch of scoring at once or intricate score marks for a fold. Also saves you from cutting when wanting to score! The diagonal board is also super helpful when doing scores for envelopes and boxes. |
| 4.Blending Brushes | |
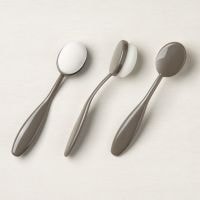 |
Oh my blending brushes. These little fellows are a blessing when it comes to adding color and making scenes! I could write an entire book on why you should have these in your tool bag! |
| 5.Soft Pastels Assortment | |
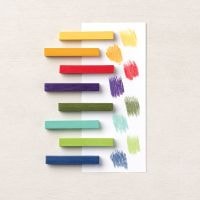 |
These are a sentimental favorite. I have been using soft pastels in art work since high school. They are a unique color tool that believe it or not has a lot of different uses and color techniques. If you want to explore coloring then grab a set of these! |
")
")
")
")


